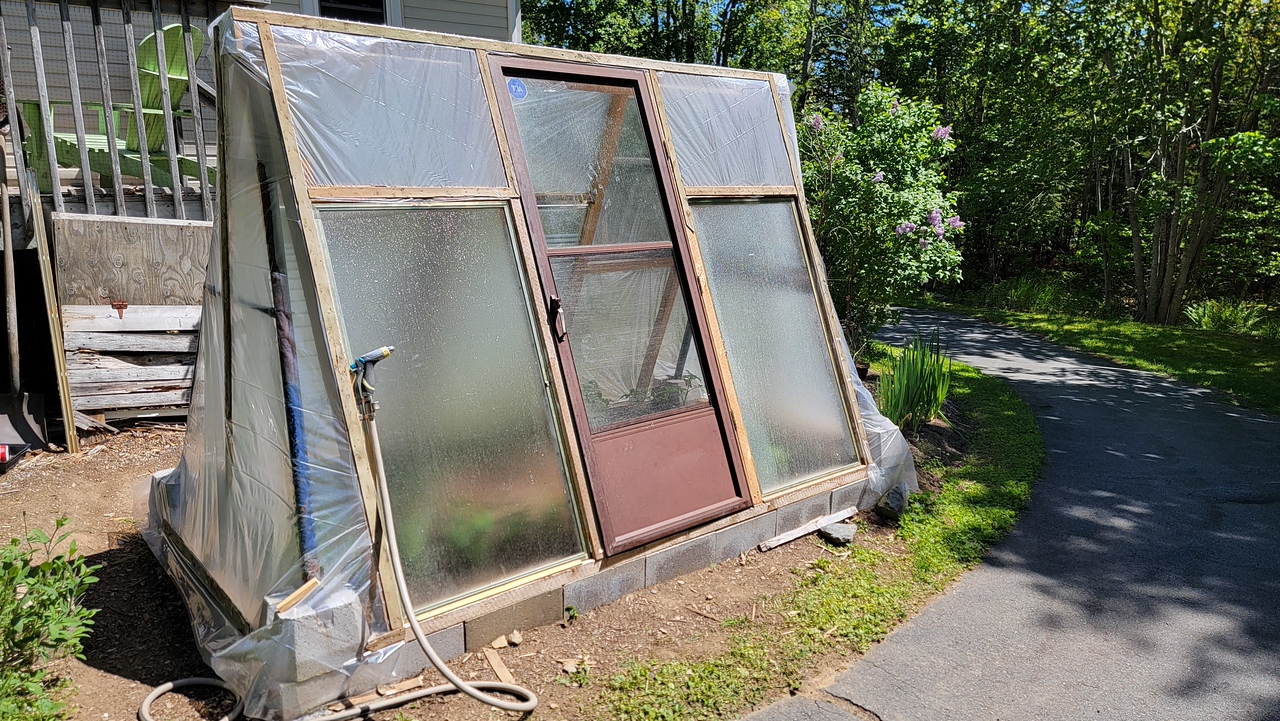
In 2024 I rebuilt the swingset greenhouse, bigger and better.
One limitation of the old greenhouse was that it was hard for a tall person (me) to move around in. That was partly because of the height of the frame, and partly because over the years, the plastic sagged inwards – when it wasn’t flapping in the wind, keeping us awake.
So I wanted to use more wood framing to widen the interior space.
I chose to use rough-cut hemlock, which is what’s used around here for long-lasting raised beds. I bought 2x4s directly from a local sawmill and carried them home in my 4-door Corolla, which is a bit of a feat in itself. By now, my financial resources were a little less strained, but I’m still frugal. And I don’t have a truck.
Another advantage of rough-cut wood is that you get the full 2 inches by 4 inches. It hasn’t been planed into the 1.5 x 3.5 inch studs used in construction.
A disadvantage to rough-cut wood is that it’s easy to get splinters in your fingers, which is more of a problem during the building process than it is later when gardening. Wear gloves when handling.
The old base, made of spruce 2x4s that I’d had lying around, had rotted completely. Wanting something that would last longer, I researched cinder blocks. Apparently, reservations to using them for food gardens pertains to how they used to be made, and they’re okay now.
So I bought enough cinder blocks to build the rectangular base. Setting them in the ground square and level led me to deep contemplation and appreciation of the stonemasons of history.
Tools used to lay the cinder blocks: measuring tape and spirit levels, both short (for the individual block) and long (lay the level on a straight 2×4 to check that opposite walls align), a construction-grade shovel (with a flat edge), biceps and triceps (they blocks are heavy), and lots of patience.
The downhill-most corner needed a more solid stone support underneath, and will require occasional inspection.
I did not use mortar. The blocks are touching each other.
But I didn’t see how they would hold the feet of the swingset.
I had a concrete deck pier block left over from a porch project. Would it work? Yes! I bought 3 more (heavy!) and laid them in the corners on top of the cinder blocks. Bonus: they added to the height of the structure. They would require some creativity in wrapping the plastic, but I’d figure that out later.
I framed the south-facing wall with 2x4s to accommodate the 2 shower doors I’d been using on top of coldframes for years. They’re sturdy and they don’t flap!
I also had our old aluminum storm door. To include it in the south-facing wall, the frame would have to be as high as the top bar of the swingset, even with the swingset raised high in the deck blocks.
The door’s frame and hinges were toast (which is why we’d put a new door on the house). In order to add hinges, I securely screwed a 2×2 (ripped from a hemlock 2×4) to the door flange. I could then attach brass hinges to the wood. It worked!
The two shower doors plus the kitchen door were the perfect width for the south wall. Plastic would have to fill the spaces above the shower doors.
(The metal swing frame is almost redundant now.)
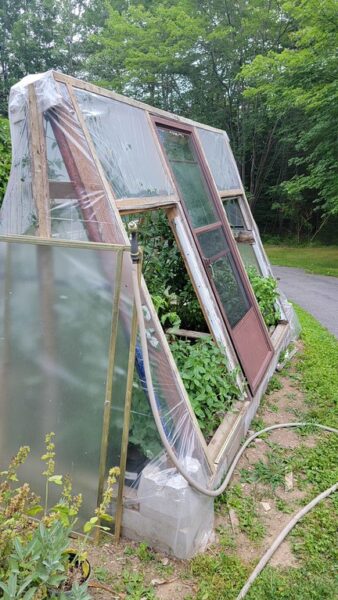
The south-facing shower doors can come off to prevent overheating in the heat of summer. Peppers and basil love it, and I use it for salad greens, seedlings, etc. in spring and fall.
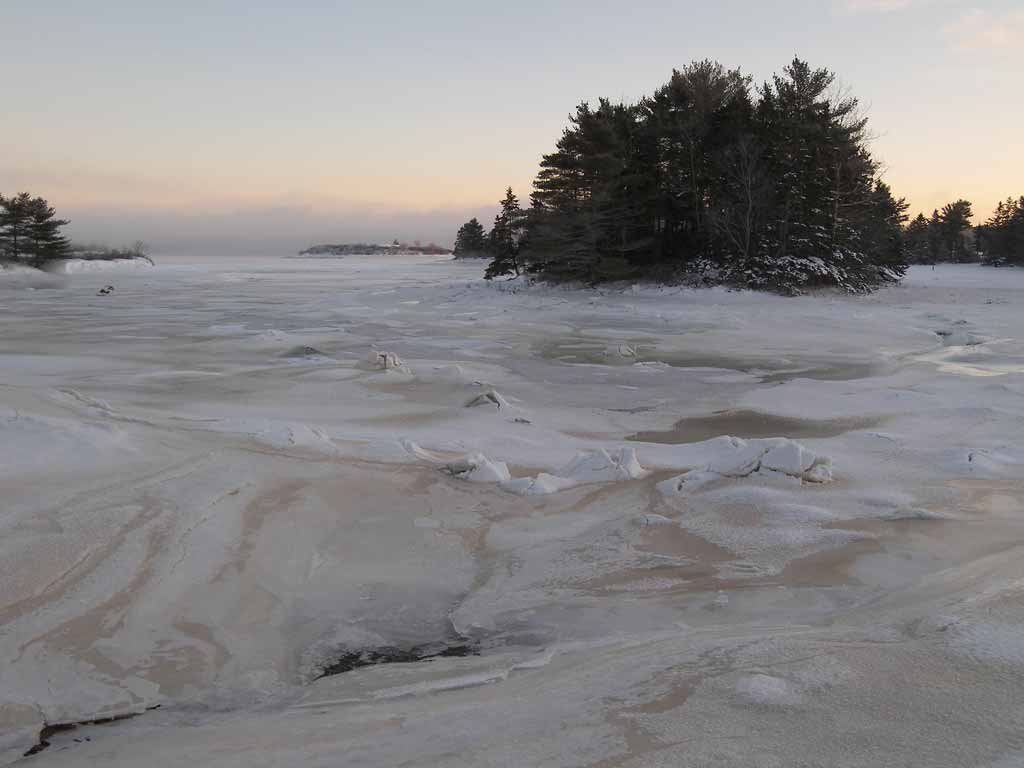
We had a whopper of a nor’easter last night. Schools closed early yesterday and it was a foregone conclusion that they’d be closed today. Many offices in the Maritimes are closed today.
Here close to the Atlantic coast, we had little rain though it was forecast. It came down as ice pellets. The top couple of inches are made of ice pellets, averaging about 1 mm in diameter.
We I don’t often get to ski on our road before it’s plowed, but at time of writing it still is covered, though it seems that 4-wheel drive trucks can get through.
As you can see, the snow drifts around to collect on the sheltered, south-facing side of my swingset greenhouse.
EDIT: 10 years later, I rebuilt my swingset greenhouse, applying lessons learned. Find that post here.
Swingset greenhouse
Is it a tiny greenhouse? Or a walk-in coldframe?
I’ve always wanted a greenhouse. I have several coldframes that I’ve been using to extend the gardening season at both ends, so that we have fresh salad from the garden at both Christmas and Easter! But I want more! I’d also like to do a better job growing plants that enjoy more heat than we get here near the sea – tomatoes, peppers and basil, for example.
The front of our one-acre property, where my main garden is, is exposed to wicked northerly winds during the winter. I worry about how a greenhouse would stand up to the storms. But the back of the house is more sheltered, and faces south. I dream of building a sunroom – let’s call it an “orangerie” to be exotic – onto the house, but that isn’t going to happen anytime soon.
However, I had this rusty, outgrown swingset, a pile of scavenged lumber, and some ideas:
Perhaps a solid back wall on the north side would better resist the wind and the snow.
Then I could put in a proper door that would make the interior easy to access during the winter.
Start the door a foot off the ground and it would be easier to shovel it out when the snow is thick and hard. No matter that you have to step over it to get in; it would be like stepping into the cabin on a sailboat.
Make the door big enough for heat to escape during the summer, since the structure isn’t big enough to cross-ventilate.
Add an opening window in the door for those in-between days when you need just a bit of ventilation.
Use up that pile of old wood and make room for new things to happen.
Swingset in summer with tomatoes and cucumbers
My six-foot-tall son – as tall as the swingset now – helped me move the frame to the garden last spring and roughly level it. We nestled it next to the asparagus bed and let tomatoes climb ropes up to the swing hooks.
As plants died back in the autumn, I redefined the garden paths to go around the future greenhouse, and set the bootstrap-engineering part of my brain to work figuring out how to build out the structure.
The first thing was to build a box around the space using old 2x4s, some of which were nailed together into thicker pieces. If I’d had bigger dimensional lumber I would have used it.
The wall after placing it on the swing frame.
Meanwhile, I set to work building the wall on a flat space in the driveway. I cut the bottom of the 2×4 studs at the required angle, and set the side studs to slope inward at the slight angle required. Then I framed in the doorway. An old piece of treated plywood determined the width of the door and became a hinged flap at the top. Because I had a lot of strapping, it became the cladding – after we pulled the old nails out.
The picture at right shows the wall after we had carried it to the swing frame and placed it in position. It was a heavy, two-person job.
I had cut the bottom boards but left them off until after I had nailed the sills to the bed frame, so that I could swing the hammer effectively.
My carpentry skills are rough, but I’ve built on what I learned from my grandfather and father by helping friends in various situations. It felt like I was using everything I know in this project, and had to make a lot up as I went along. Plenty of opportunity for problem solving!
After placing the wall and adding a post under the door.
For example, after placing the wall, I realized that it would be tempting to sit on the door sill, so I added a vertical post to support it (left), which would be standard framing technique anyway. In fact, there should be another short post on each side, next to the studs – if you were building to code, which I wasn’t.
The wall boarded in.
Then I boarded in the bottom of the wall using the pieces that I had pre-cut.
Any stained or treated wood is high up in the structure, away from the soil.
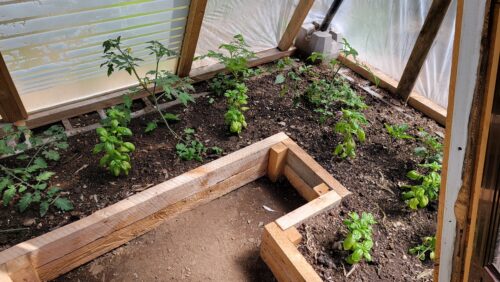
Because the season was getting late, and I had seedlings already growing too thickly in my coldframes, I had prepared the bed and transplanted a variety of seedlings into it before the wall was ready. It was easier to do while the space was open. I had no need to step on the bed while assembling the wall.
I built the door on the flat driveway and hung it after the wall was in place, using heavy hinges.
Once the door was hung, we added the plastic, which had come second-hand from a commercial greenhouse via a friend. We stapled it in place, one plane at a time, and applied my best gift-wrapping technique to make it flat. I nailed strapping in place to hold the edges all around. It needs to be well attached to withstand the storms.
I hadn’t intended to cover the boards with plastic, but it turned out that it was possible to do so. It will make the greenhouse warmer, though it will breathe less.
The almost finished greenhouse
All I had to buy for this project was the hinges. I used up most of the scrap wood I had on hand, and I had enough nails and screws from former projects – some mine, some my father’s, and some my grandfather’s! I’m lucky in a way to have inherited everybody’s stuff, and I’m delighted to put them to good use. My grandfather, who built the first coldframes I ever saw, must be smiling at this little structure.
One unforeseen benefit of the design is that the weight of the door on the inward slope keeps it in place whether it’s closed or open. I don’t think I’ll need to use a latch or hook, even in the howling wind.
A short person could stand up inside. Not me.
It already feels like a greenhouse inside – warm, sheltered, moist, a place to grow. I’ll be looking for excuses to hang out here during the winter. A little kitchen stool is all the furniture it can handle, but even that will allow one to sit rather than squat. Hmm… maybe a hammock which I can tuck up and away when not in use…. the swing hooks are still there, after all.
I’ll watch and listen carefully for flapping and wear and tear on the plastic. Maybe I’ll cut clips out of PVC tubing to attach the plastic to the metal on the south side.
The plastic will need to be replaced every few years; something to plan for.
My seedlings look happy.
Now I’m actually looking forward to winter!
UPDATE 2018: The size of the plastic on the south side is too big, and has stretched as it flaps on windy days, especially if the door is open. It happens to be near our bedroom window and the noise of the flapping is annoying. When I replace the plastic, I’ll build a frame similar to that on the north side, but not boarded in, so it flaps less and gives me a little more room to move around inside.
You could also design your frame to hold old windows. However, I’ve used old windows on coldframes and they have two disadvantages:
If they break, it’s a pain to clean up the broken glass in the soil;
Windows old enough to have lead paint are also old enough to have that paint flake and get into your soil. Not healthy.
I’ve had better experience with tempered glass, from shower doors, for example, which I’ve used for several years on coldframes without mishap. Aluminum screen doors and windows are also good. I’ll be sticking with those in the future.
Oh – and I LOVE going into my little greenhouse and at colder times of the year to pick a fresh salad for guests, or for Christmas dinner!
I have a male and a female Actinidia kolomikta (one of a couple of species of Arctic Kiwi that grow in our climate) in bloom. A male plant is needed to fertilize the blossoms of the female plants, and they both make flowers. I was curious to learn how to tell the flowers apart.
Easy, as it turns out, once you look. The female flower has white stigmas and styles that radiate from the center. The male flower has yellow stamens dangling from thin filaments.
Male flowers, with yellow stamens
Female flowers with white parts radiating out from the middle
The female flower on the left has lost its petals.
The foliage is variegated.
When I first saw the variegated foliage, I thought it was diseased! But no, it has splashes of white and even pink. A most attractive plant. Some people even grow the male plants only, just for the foliage. But the fruits are delicious, grape-sized little kiwis. You don’t need to peel them as the skin is smooth. They taste just like the larger variety that you can buy in the grocery store. They will fall off the vine when they get really ripe and sweet, so it probably pays to harvest them a bit early and let them ripen in a bowl.
It was getting hard to believe that spring would ever come. There is a collective weariness of snowstorm after snowstorm. Finally, however, the force of the entire planet tilting on its axis, turning the north pole toward the sun, will overcome all obstacles and we will really have spring! Crocuses have been sighted. The spinach I planted in a coldframe last month has sprouted. The first salad of spring, culled from coldframes and a mini hoop tunnel, appeared on our supper table yesterday. The snow is almost gone from the yard.
Don’t visit Nova Scotia in March and April. Go to Europe or Vancouver instead, where the daffodils have long faded and the grass is green. Come here in May! You may fall in love.
From the coldframes: lettuce, green onion, chervil, claytonia (miners lettuce) and fresh dandelion greens
It has been a cold winter, except when it thawed of course, as it usually does once in January before the snow locks us in again.
Jan. 15: Coldframes, hardy strawberry plants toughing it out, and double-covered greens
The snow we had in December, which made us happy at Christmas, had melted completely by January 15, exposing the coldframes and mini hoop houses in my garden.
Lettuce ‘Merveille de quatre saisons’
Peeling off the layers of plastic and row cover on the mini hoop house showed that there was lettuce within, still looking perky after the deep freeze.
No wonder; its name is “Merveille de quatre saisons” – which you could translate as “Four-Season Wonder”.
If you pick your plants well, plant them at the right time, and shelter them adequately, you can indeed eat from the garden year round.
Niki Jabbour, who lives and gardens not far from me, and also has a radio show on gardening, has written a wonderful guide to year-round gardening (left). It is inspiring many people like me to expect more from our gardens.
When the hoops are iced up, however, and the coldframes piled high with snow, I yearn for a greenhouse.
Exciting things are happening around the old Blockhouse School near Mahone Bay. The 1962 building has been abandoned since the local French Acadian school moved to its new location outside Bridgewater in 2010. That left the property in the hands of the Municipality of the District of Lunenburg (MODL). Plan B was to bulldoze the property. They were looking for someone with Plan A.
A growing group of people has been coming together around a vision – repurpose the building, and show the world how it can be done. Insulate it to its eyeballs and add active and passive solar heating. Use it as a business incubator for projects that will make the area more self-sufficient and sustainable. Plant perennials that will add to our food supply in the long term, and teach people how to do the same. Aquaponics. Permaculture. Green roof. Composting toilets. Time-share commercial kitchen.
Possible future model All these things have been done elsewhere; we just need a model of how to do it here.
I always thought of Staghorn Sumac as a bush, not a tree – until we moved to our present house, where two gorgeous Staghorn Sumac trees grace our yard. They are particularly beautiful in autumn.
The house is about 23 years old, and I presume the sumacs are around the same age.
Sumacs generally sucker like crazy: shoots come up from their roots and will grow as big as competition allows. But apparently, if you mow around the tree, allowing only one sumac stem to grow, it will grow to the height of a small tree, about 18′ (5.5m) tall. These trees still grow suckers, but they tend to appear some distance from the tree. Presumably they don’t grow as readily on older roots.
The leaves form an umbrella to catch the light. We have to prune them regularly along the driveway on their southeast side where the branches have grown too low. Branches on the inside of the umbrella die off and break off easily.
The root system must be fairly weak, as both trees lean away from the direction of the strongest winds. One of them (not the one in the picture) reportedly toppled over in Hurricane Juan. The previous owner pulled it upright with his ATV. It still stands, but since it is getting harder to mow under it on one side, it must be gradually leaning more and more, like the Tower of Pisa before they fixed it.
I have successfully removed two other sumacs on the property by sawing them down and removing any shoots that appeared for a couple of years. So they are not too persistent.
Our sumacs are great climbing trees for young children, as the branches are low. Birds are also drawn to them for the seeds that grow in attractive fuzzy red spikes. The spikes stay on the tree all winter, making the sumac a most attractive tree year-round.
I just scored a truckload of chipped branches from a road crew trimming the area around the phone and power lines on our road.
They were happy not to have to cart it back to Halifax, where the truck was headed, so I suppose I saved the contractor a bit of money in diesel.
But I feel like the real winner. I was thrilled to get this much steaming organic matter, a nice mix of “browns and greens” (branches and leaves) which avid composters know to be the ingredients of the slow fire in the middle of a compost heap that produces all that nice gardener’s gold that makes gardens grow.
I’m spreading it over future garden beds. First, I covered the sod with overlapping layers of corrugated cardboard (from behind a grocery store) to smother grass and weeds. Under the cardboard are oak leaves that someone was throwing away. (More free organic matter!) The woodchips go on top of the cardboard in a thick layer. Later I’ll add some manure (which I’ll have to pay for).
In a year or two, the beds will be ready for annual vegetables. The soil will be deeper and contain more organic matter, which it sorely needs. I get out of breaking sod, which is the physically hardest part of gardening. The worms will do the work for me.
Spreading woodchips on future garden beds.
The soil here is sandy and poor – not like the rich drumlin soil of the LaHave River Valley nearby. It needs lots of organic material to become productive for gardening.
Fortunately, Nova Scotia is a leader in “waste” management. Even if I had not intercepted this truckload of material which is so valuable to me, it would have been composted, not buried in a landfill.
Yesterday I went on a tour of Windhorse Farm, a sustainable farming and forestry operation located up the LaHave River from Bridgewater.
Brush wall and fence at Windhorse Farm
I was most curious to see their brush walls. When I first heard about Windhorse’s brush walls last winter, a light went on in my head. Here was the answer to several of my problems, including the strong north wind chilling the garden, and large amounts of brush available.
Windhorse’s brush walls are piles held in place by stakes 6 feet apart, making a thick wall. As the brush gradually breaks down, more is piled on top. Vines such as squashes and grapes are encouraged to climb over the brush, and in summer, the brush walls can be completely hidden by vegetation.
My picture also shows a higher brush fence that has been woven around taller stakes. In fact, it’s about 7-8 feet high, high enough to keep out deer.
The brush walls contribute greatly to the success of Windhorse’s garden. They enclose and shelter it, holding in heat. The decomposing brush adds to the fertility of the soil. And very importantly, the brush walls provide habitat for all sorts of wildlife, including the friendly critters that help control garden pests.